Gootloader infection cleaned up

Dear blog owner and visitors,

This blog had been infected to serve up Gootloader malware to Google search victims, via a common tactic known as SEO (Search Engine Optimization) poisioning. Your blog was serving up 372 malicious pages. Your blogged served up malware to 0 visitors.

I tried my best to clean up the infection, but I would do the following:

  • Upgrade WordPress to the latest version (one way the attackers might have gained access to your server)
  • Upgrade all WordPress themes to the latest versions (another way the attackers might have gained access to your server)
  • Upgrade all WordPress plugins (another way the attackers might have gained access to your server), and remove any unnecessary plugins.
  • Verify all users are valid (in case the attackers left a backup account, to get back in)
  • Change all passwords (for WordPress accounts, FTP, SSH, database, etc.) and keys. This is probably how the attackers got in, as they are known to brute force weak passwords
  • Run antivirus scans on your server
  • Block these IPs (5.8.18.7 and 89.238.176.151), either in your firewall, .htaccess file, or in your /etc/hosts file, as these are the attackers command and control servers, which send malicious commands for your blog to execute
  • Check cronjobs (both server and WordPress), aka scheduled tasks. This is a common method that an attacker will use to get back in. If you are not sure, what this is, Google it
  • Consider wiping the server completly, as you do not know how deep the infection is. If you decide not to, I recommend installing some security plugins for WordPress, to try and scan for any remaining malicious files. Integrity Checker, WordPress Core Integrity Checker, Sucuri Security,
    and Wordfence Security, all do some level of detection, but not 100% guaranteed
  • Go through the process for Google to recrawl your site, to remove the malcious links (to see what malicious pages there were, Go to Google and search site:your_site.com agreement)
  • Check subdomains, to see if they were infected as well
  • Check file permissions

Gootloader (previously Gootkit) malware has been around since 2014, and is used to initally infect a system, and then sell that access off to other attackers, who then usually deploy additional malware, to include ransomware and banking trojans. By cleaning up your blog, it will make a dent in how they infect victims. PLEASE try to keep it up-to-date and secure, so this does not happen again.

Sincerly,

The Internet Janitor

Below are some links to research/further explaination on Gootloader:

https://news.sophos.com/en-us/2021/03/01/gootloader-expands-its-payload-delivery-options/

https://news.sophos.com/en-us/2021/08/12/gootloaders-mothership-controls-malicious-content/

https://www.richinfante.com/2020/04/12/reverse-engineering-dolly-wordpress-malware

https://blog.sucuri.net/2018/12/clever-seo-spam-injection.html

This message

Posted in Uncategorized | Comments Off on Gootloader infection cleaned up

Audio in an iOS Web App

One of the additions to the HTML5 spec is the new <audio> and <video> tags which allows you to play sounds (or videos) and control them programatically via JavaScript.

Audio tag information via HTML5Doctor.com

I thought this would be a great addition to the game for the question screen, where the idea was that when the countdown timer got to 10 seconds left an audio file of a ticking clock sound getting progressively louder would play, and then when the time reached zero, a bell sound would go off.

The code worked great on a desktop, but there are some restrictions in the iOS WebKit which prevents it from being used in the game, so I removed it. Specifically:

  • iOS blocks a web page from automatically playing a sound via the autoplay attribute in order to save bandwidth (fair enough)
  • In order to play the sound, a user action is required to trigger the sound
  • In previous versions of iOS, javascript could be used to simulate a click on the page which would trigger the sound – this hack stopped working with iOS 4.2

So much for that idea… So rather than an audio cue when the timer ran out, the app uses JavaScript to flash the background color of the timer to let the player know time’s up.

Posted in Uncategorized | Comments Off on Audio in an iOS Web App

Board Design Part 2

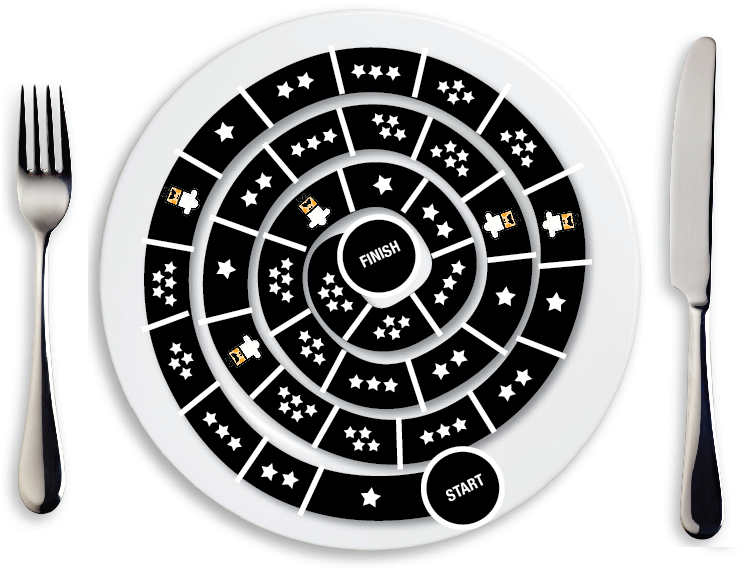
Here’s what I came up with for the next version of the board:

I think that this is the way to go – what do you think?

Posted in Uncategorized | Comments Off on Board Design Part 2

Board Design Part 1

Right from the initial inception of the game I had an image in my mind about what the physical part of the game would look like. The first thing that popped into my head was a spiral layout. I guess I thought it would be interesting for a couple of reasons:

  • I have to admit that the first thing I thought of was that it reminded me of a sausage coil, danish, dinner place setting etc
  • Because it was circular you could place it in the middle of the table and it would be “right side up” to everyone
  • Potentially it could be more compact, and so take up less space in the middle of a decorated table (or coffee table)

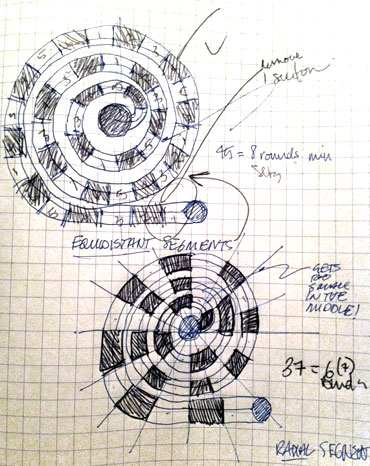
I did a couple of sketches to figure out how the spaces would be created, whether they were based on equal segment spacing or on a radial segment:

That showed me a couple of things: The problem with radial spacing was that the segments get smaller as you get to the centre, which may be problematic based on the size of the playing pieces, and also it looked a little too much like a dart board.

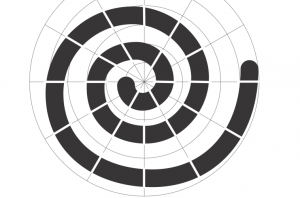
The next thing I discovered was that it’s really hard to figure out how to draw a spiral so that the spaces between the rings are even:

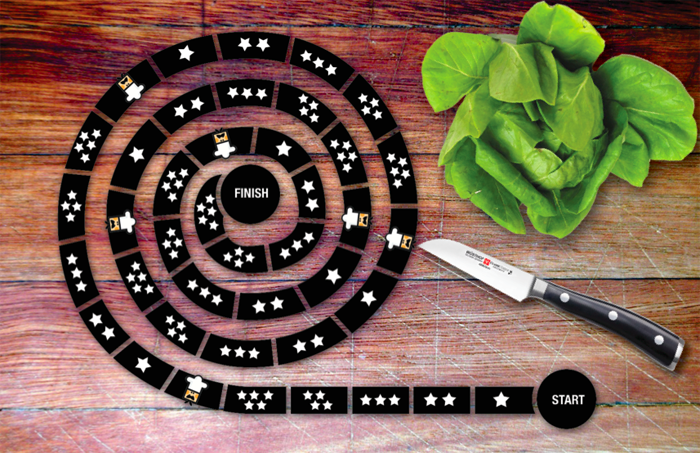
So eventually I had to basically do it by hand, which wasn’t fantastic, but it gave me a chance to print something out at 11×17 and see whether it makes sense physically. Below is the first  printout I came up with.

It has 7 sequences of 1-6 (The Chef) to make it to the middle, and so one of the interesting things will be to see if that is too long a path / too short etc…

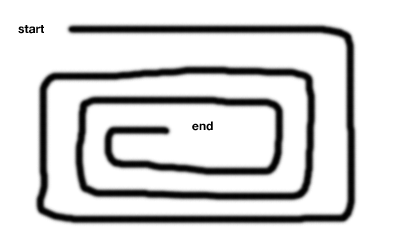
I guess an alternative would be to do a path that’s more of a squared off version, like the sketch shown below:

We’ll see…

Posted in Uncategorized | Comments Off on Board Design Part 1

Questions, questions, all about the questions…

So one of the important parts about the game are what kinds of questions are going to be asked and how will they be organized.

Organizing the Questions

The Trivial Pursuit model has questions broken up into categories based on subject matter, but I wanted to try and do something different. Since there is a programatic element to the game, I thought it might be interesting to divide the “categories” not on subject matter, but on degree of difficulty which would allow the rewards / punishments to be modified based on that – answering a harder question might get you a greater reward, and likewise missing a simple question might increase the chance of a bigger punishment (I must think of a better term).

The first thing I thought of was the Michelin star rating system for restaurants, but that only goes to three – although ratings for hotels etc go to five which is perfect. So I decided on 6 categories (which align nicely with the number of faces on a single die) and they are:

  1. One Star – questions anyone should be able to answer
  2. Two Star – little bit harder questions
  3. Three Star – good knowledge of basic cooking etc needed
  4. Four Star – some more advanced topics / questions
  5. Five Star – real food nerd questions
  6. The Chef – these are not questions per se, but random pronouncements from the Chef which can be positive or negative – think of Community Chest from Monopoly…

One of the challenges will be to determine what constitutes a 5 star question vs. a 4 star question etc…

Types of Questions

Another task is to define the types of questions that will be used in the game. This is especially important in light of the fact that I’d like to make the submission of new questions something that anyone can do, so the types need to be clearly defined. For now here’s what I have in mind:

Basic Q&A

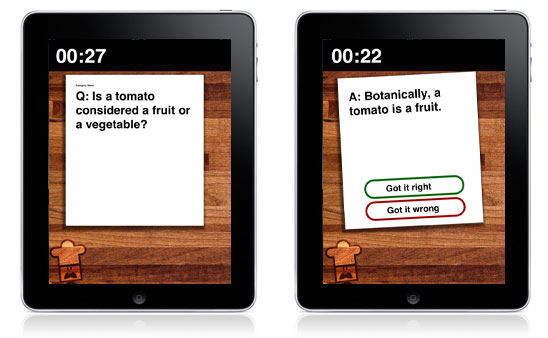
These are the most common type of questions, similar to the type you’d find in a Trivial Pursuit type game, and can be tailored to suit the different levels of difficulty – for example a 1 star question might be a true/false question, whereas a 5 star question would be much more esoteric.

List or Ingredient Based Questions

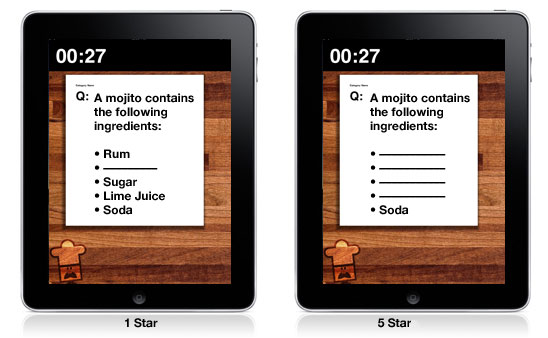
These would be more unique to the game and would either require the player to identify the dish/drink based on a list of the ingredients, or the other way around where the player is given a dish/drink and asked to provide the main ingredients. The degree of difficulty could be determined by the number of ingredients the user needs to supply for example.

Image Based Questions

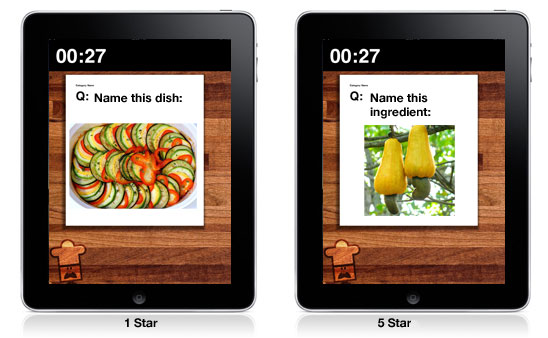
Another great thing about having an online pool of questions is that we can display other types of media such as images / movies etc.

So those are the basic ideas for the categories and questions for the game – any ideas or suggestions for other ways of approaching it would be welcome…

Posted in Gameplay | Comments Off on Questions, questions, all about the questions…

CSS3 Animation Goodness

Disclaimer: I’m sure that there are more efficient, cross browser ways of doing this, my intent is to simply share what worked for me…

One of the great things about CSS3 is that it allows you to create dynamic transformations like moves, rotations or even 3D flips all via pure CSS (and via Javascript as an extension). This was a real eye-opener for me, as it was a really simple way to add some life to an app that’s basically a series of web pages, and make it feel more like a ‘real’ app.

For detailed information on CSS3 here are a couple of excellent resources, again I’ll just be describing the shortcuts I used to get done what I needed to:

So here’s the way that I explain to myself how it works, there are 2 important parts to animating an element (say a <div>):

  1. First define a transition – you can do this globally by attaching it to a class declaration that all of the elements share, or you can do it individually using the ID selector, the basic syntax is:
    -webkit-transition: all 500ms ease-out;
    This sets the transition for all types of transitions (i.e. opacity, rotation, translations etc) to last 500ms, and they ease out (basically they slow down slightly at the end of the transition). Check the Apple CSS3 Guide for more comprehensive details
  2. With the transition defined you can add a second line to the CSS class which defines the action (the transformation) for example:
    -webkit-transform: translate(-800px,0px);
    In  this example, the element will move 800 pixels to the left of it’s original position.

    You can also combine translations in one line for example:
    -webkit-transform: translate(-800px,0px) rotateZ(15deg);
    The example above will both move the element 800 pixels to the left and rotate it so that it will end up 15 degrees around the Z axis.

So that’s the basic approach, the thing I realized is that the translation is applied as soon as the code is loaded, so if you want the event to happen based on a user event, then you can either use the :hover pseudoclass which will apply the transition when the mouse is over the element, and then revert it when the mouse leaves the element, i.e.:

#moveDiv{
-webkit-transition: all 500ms ease-out;
left:800px;
}

#moveDiv:hover{
-webkit-transform: translate(-800px,0px) rotateZ(15deg);
}

Using the above, when the cursor moves over the div id=”moveDiv”, the element will move and rotate until the cursor is moved off of the space occupied by the element in it’s original position.

All this is great but what about if you want the transition to happen after a specific event, or on a user click? Well the great thing is that you can set those properties via JavaScript, and therefore control when the transition occur. Below is a simple example of animating the div id=”moveDiv” as in the example above, but having it occur when a mouseClick event calls a function moveIT();

function moveIT(){
var theDiv=document.getElementById(‘theMoveCard’);
theDiv.style[‘-webkit-transform’] = ‘translate(0px,-1000px) rotateZ(2deg)’;
}

So you can see by the same basic approach you can programatically vary things like the speed with which the transition happens, or the amount it’s translated, or the amount it’s rotated etc.

In terms of application to the game, I had 2 problems for the main screen: 1) I noticed that the background image to just long enough to load such that once it was loaded the buttons had already completed animating into their final positions and 2) it looked really boring having all 6 buttons come in at the same time, I wanted to stagger their animation but didn’t want it to be the same every time – to give some sense of newness, so what I ended up doing was:

  1. Creating a function that only starts animating the buttons in after the pageLoad() event is complete and
  2. Within the function used javascript to randomly set the speed of the individual buttons, so that every time the screen is shown they appear in a different order

Here’s the code, note that I’ve given each of the buttons a unique ID ( button1, button2 etc) , and that they all share a common CSS class that places them 800 pixels to the right of their final position. Once the page has loaded, the following function is called and the 6 buttons slide into place:

function slideQuestions(){
for(var i=1 ;i<7 ; i++){
var divName=”button”+i;
var theDiv=document.getElementById(divName);
var randomnumber=Math.floor(Math.random()*21);
var randomdecimal = randomnumber/1;
theDiv.style[‘-webkit-transition’] = ‘all .’+randomdecimal+’s ease-in-out’;
theDiv.style[‘-webkit-transform’] = ‘translate(-800px,0px)’;
}
}

Note that in this case the transformation is the same for all the buttons, it’s just the transition that gets manipulated. Basically I took the same approach for the rest of the application any time something animates in any way. Again, I’m sure there are more elegant ways to do the same thing – this is just what makes sense to me.

Next up – questions, more questions, only questions!

Posted in CSS3, Design | Comments Off on CSS3 Animation Goodness

The Metaphor’s The Message…

Before getting into more of the design of the game, I wanted to work out what made sense in terms of a metaphor for the game / gameplay. My initial idea was that the iPad physically was about the same size and shape as a restaurant menu, so I had thought about using that idea to drive the design of the game.

The other thing that I had mentioned was that I wanted to incorporate some randomness into the gameplay to make it a bit more interesting than the standard ‘answer a question and move ahead a square’ model, and I thought that the famously mercurial behaviour of a chef would be a perfect metaphor to justify some unanticipated outcomes.

So after pondering it a little more, I decided that rather than take place front-of-house, the game would be set in the kitchen, with the players taking on the part of the kitchen staff, with the role of Chef being assumed by the person directing the play with the iPad, asking the questions and doling out the rewards / punishments for the round.

That led to a number of design decisions to help fit the metaphor:

  • The visual design of the app could be based around kitchen and food prep imagery, rather than a menu etc
  • The spaces on the board could be referred to as ‘stations’ as in ‘move ahead 2 stations’
  • The questions will make more sense as questions to Chefs staff – as opposed to the diners, and consequently the ‘punishments’ could be tailored to fit that context
  • You could have more fun writing the responses as it makes more sense for a Chef to abuse/reward the staff as opposed to diners…

So that’s the decision at this point, I think it could work – we’ll see once the design and the gameplay is fleshed out a bit more…

Posted in Design | Comments Off on The Metaphor’s The Message…

Switching CSS Dynamically Without Javascript

Disclaimer: I’m sure that there are more efficient, cross browser ways of doing this, my intent is to simply share what worked for me…

One of the nice things I discovered about CSS3 is the ability to detect devices and swap CSS files automatically without any javascript. The following code will enable you to use a different CSS file based on the device:

<link rel=”stylesheet” media=”all and (max-device-width: 480px)” href=”iphone.css”>
<link rel=”stylesheet” media=”all and (min-device-width: 481px) and (max-device-width: 1024px)” href=”ipad.css”>
<link rel=”stylesheet” media=”all and (min-device-width: 1025px)” href=”ipad.css”>

Although I don’t use it in my app, there are also ways to detect which orientation the device is using (landscape or portrait) and to dynamically apply different stylesheets based on that. Here’s a link to more information on that topic…

So back to the code I did use – the first line sets the CSS for an iPhone / iPod Touch, the second line specifies the CSS for the iPad, and the third line is for webkit browsers – since I’m not really worried about optimizing things for desktop browsers, I chose to just point it to the same stylesheet as the iPad.

Posted in CSS3 | Comments Off on Switching CSS Dynamically Without Javascript

Setting up WebApp framework – the basics

Let me start off by saying that my intent here is to give some shortcuts and tips that I found were useful – not to provide a thorough or comprehensive overview of the technologies. So on we go:

Setting Up The App to Look Like an App

So the first thing I wanted to do was to figure out how to make the webapp look more like a standalone and that required a couple of things:

  1. Hiding the parts of the UI that looked like a browser
  2. Making the app accessible from the device without having to use a bookmark (or safari at all)

Turns out it’s pretty simple to do although it does take a couple of steps:

  1. The web page has to be declared as an HTML5 page. To do so simply modify the DOCTYPE HTML tag at the top of the web page to:
  2. <!DOCTYPE html>
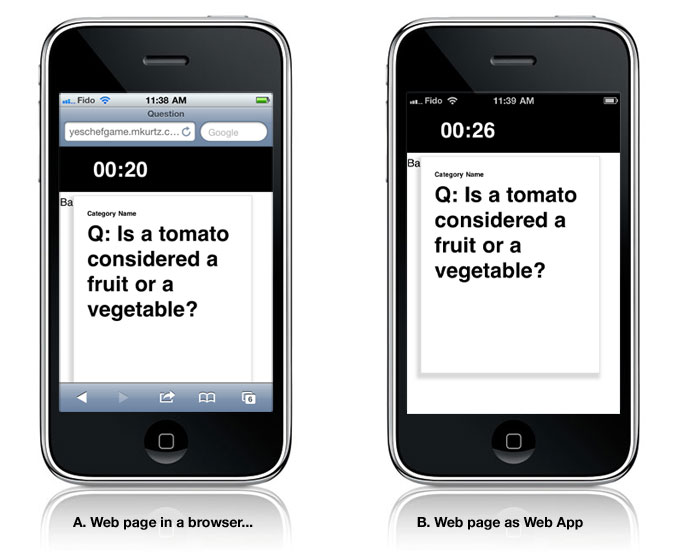
  3. Once you have done that, then add the following 3 lines of code in the <head> of the HTML. What it does is 1) tell the browser it’s a web app, 2) prevents the user from scaling the content as well as setting the width of the viewport to the width of the device and 3) changes the style of the status bar to black as shown above :
  4. 
    
    <meta name="apple-mobile-web-app-capable" content="yes" />
    <meta name="viewport" content="user-scalable=no, width=device-width, initial-scale=1.0, maximum-scale=1.0"/>
    <meta name="apple-mobile-web-app-status-bar-style" content="black" />
  5. After that, you can define 2 other things, a graphic that gets used as the button on
    your home page – this is a 75px x 75px graphic in either JPG or PNG format. The
    second graphic is used as a splashscreen, and it’s size is dependent on the device:

    1. For an iPad, the graphic must be 1004 x 768 pixels
    2. For an iPhone / iPod Touch, the graphic must be 460 x 320 pixels
  6. Upload those images to a webserver and then add the URL for those items to the
    following 2 lines of code in the <head> tag of the webpage:
  7. <link rel="apple-touch-icon" href="http://yoururl/touchicon.png" />
    <link rel="apple-touch-startup-image" href="http://yoururl/startup.png" />

    Add the app to your device

    Now you are ready to add the webapp to your device. In order for the code above to take effect you need to do the following (simply refreshing the browser won’t work):

    1) Navigate to the first page of the application using Safari.

    2) Click the action icon in the browser and select “Add to Home Screen” from the buttons that appear

    3) This will add a new application icon using the image you specified above (the default name for the application will be the title of the page)
    Yes Chef Application Icon

    4) Click the icon to open the app on your device and you should see the splash page you specified, followed by the first page of the site without the extra browser UI elements.

    Resources

Posted in Design, HTML 5 | Comments Off on Setting up WebApp framework – the basics

Design Approach

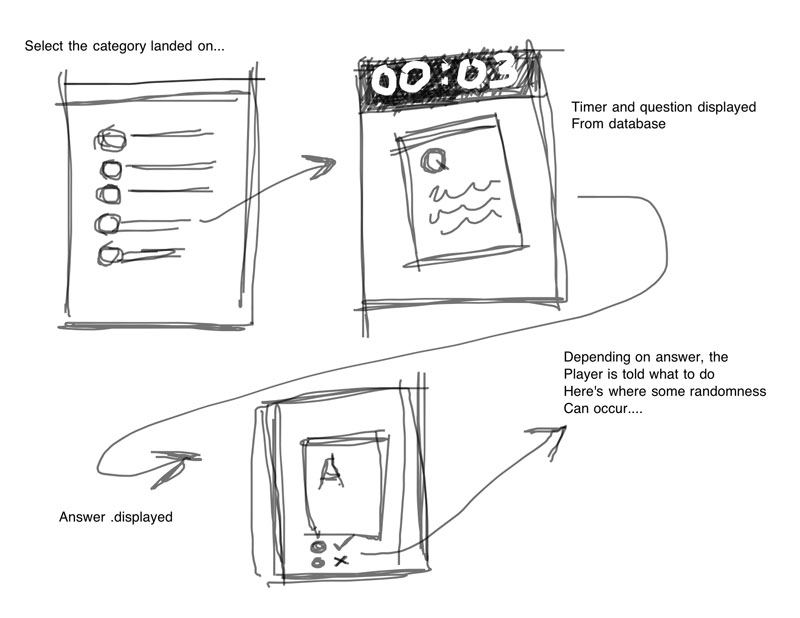
So I decided to approach the project by thinking about the actual interaction flow and how the game would look, and then worry about all the behind the scenes stuff. Since I had a pretty good idea about how it would work in my mind, I turned my attention to figuring out what the UI of the online portion would look like and came up with a really rough sketch showing what I needed:

So basically I figured I’d need at a minimum:

  1. A screen that displayed buttons for the different types of categories a player would land on
  2. A screen that displayed the question as well as a timer
  3. A screen that displayed the answer with some buttons for right answer and wrong answer
  4. (not shown) A screen which showed the response to getting the question right or wrong, and gave instructions to the player how to move etc

After looking around at some CSS3 examples, I realized that I could combine screens 2 and 3 into a single page, and use the CSS3 CardFlip effect to show/hide the answers. I also realized that I need some kind of static splash screen as well as an info page explaining the rules of the game etc.

So all-in, there is a total of 4 separate pages and a splash screen. Up next: creating the framework for the HTML 5 pages.

Posted in Design, Gameplay | Comments Off on Design Approach